Saturday, April 29, 2006

Bacon Stuffed Burgers

Food writers of the world, I feel that I must warn you. If you are trying to write a grocery list, planning to create a meal that will challenge and inspire you, do not, I repeat: do NOT talk to my friend Veronica. Because sweet Veronica, in her lilting and oh-so-charming southern accent, will tell you all about the amazing hamburger she just ate, and you will be able to think of nothing else.


I really fear that I'm becoming a kind of dull cook lately. Don't get me wrong, everything is delicious, but it borders on the mundane to read about. I need to awaken another part of my culinary multiple personality, the side that makes fresh ricotta, or who has been known to spend a weekend simmering beef stock.

Or maybe I should just shut my trap and enjoy this incredibly delicious hamburger. What made it so delicious? Well, in a fit of mad genius*, I decided to crumble up some very nice bacon and mix it into the ground beef. I know, how could I do such a thing? It was so good. It made the meat smoky and moist and what can't bacon improve? Seriously, I want to know.

Slathered with Lemon Avocado Mayo and topped with crisp lettuce and thinly sliced tomato, this was a work of art. Well, maybe not, but it was a work of beef, especially when cradled by a homemade bun. A side of perfectly smokey and charred grilled vegetables were a healthy and fitting complement to the bastion of cholesterol taking up half of the plate. Put bacon in your burger. It's really good.

Now I have to go out and make a spun sugar birdcage or something, lest I completely lose what little respect I've garnered.


*I hardly think that I was the first person to come up with this brilliant innovation, but I'm rather enjoying the view from my high horse, so I refuse to Google it and find out. Don't rain on my parade!

Friday, April 28, 2006

Quiche aux Fine Herbs (waxing poetic)

The sunlight in East Tennessee is often magical, but it is even more so in the spring. The light is golden, dappled, filtered through the chartreuse new leaves popping out on trees. Suddenly, everyone looks more attractive, the noisy world fades to a lazy whisper, and you are content to do absolutely nothing, other than soaking in this just-warm-enough sun.


Of course, there are ramifications, jolting bursts of reality that shake your sun-addled brain awake. Before you know it, you've ignored your garden for two weeks and there are terrifying new weeds and enormous heads of neglected lettuce taking over. You haven't been to the grocery store in ages, and now you aren't sure what kind of dinner you can cobble together. You are suddenly conscious of your laziness and feel the need to take on a project. You bake bread, making rolls, hamburger buns, a mock baguette. But still the threat of dinner looms. You decide to take on your herb garden and are immediately presented with an answer: quiche.


The recipe varies a bit from my classic mushroom quiche, but of course the idea remains the same. Weed your herb garden, trimming back the fragrant plants, and put those trimmings to good use at dinner. If you have eggs, cream, and a few cheeses, you are already halfway to a simple dinner, made to be enjoyed while cool breezes blow through your tranquil, if only for a moment, home.


Quiche aux Fine Herbs
serves 4-6 (the leftovers are lovely)

1 pie crust, homemade or store bought
1 medium yellow onion, finely chopped
pat butter
olive oil
3 eggs + 1 egg yolk
.5 cup cream
.5 cup 1% milk
1.5 cups of shredded cheese (I used a mixture of Parmesan, Gruyere, and chevre)
small pinch freshly ground nutmeg
2 Tbsp finely minced fresh herbs (I used flat leaf parsley, rosemary, thyme, lovage, and chives)
sea salt
freshly ground pepper

Preheat oven to 350 degrees. Prick the bottom of your pie crust several times with a fork, and then bake until dry, but not brown (about 10 minutes). Remove from oven and set aside to cool.

Place the butter and a drizzle of olive oil in a medium saute pan over medium heat. Add onions and saute until translucent and beginning to turn golden brown around the edges. Set aside to cool.

In a bowl, whisk together the milk, cream, and eggs until very well combined. Add a pinch of salt, and a few grinds of pepper and nutmeg. Lastly, whisk in your herbs. Sprinkle half of your cheese mix over the bottom of your cooled pie crust. Spread the cooked onions over the cheese evenly, then top with the remaining cheese. Pour the egg mixture over the top.


Bake at 350 degrees for 35-45 minutes, until the surface is a nice golden brown. Remove and let cool for at least 10 minutes (I actually pulled this out of the oven 1 hour before I planned to serve it, and it was perfect). Serve with a crisp green salad and an icy cold glass of white wine. Enjoy your meal, and let yourself slip back into delicious laziness, because the work can wait until tomorrow.

Wednesday, April 26, 2006

What I've been up to.

Hi! HI! Can you see me over here, waving frantically? Have you taken note of the apologetic look in my eye, the air of contrition around me? Or have I been gone so long that no one bothers to check in anymore? I'm terribly sorry. The illness I referred to last week let up right as I had to leave town for a wedding. Upon returning from the wedding in Florida, I was blessed with a visit from my best friend, who lives in London. With her I've been enjoying the spring weather and blatantly shirking my writing responsibilities. I've been cooking, yes, but I've also been blissfully NOT writing about it. I have taken a few pictures over the past few days, and so, in preparation for a real entry (and to try and coax some readers back), I give you lots and lots of pretty pictures. Okay? Okay.


Lastly, this is what Buster thinks about this new, dreary weather:


And, one more thing, I'm afraid that I will not be posting with quite the regularity that you may be accustomed to, at least for several weeks. I have some exciting projects that are going to demand more and more of my time, and while I can't go into them just yet, I promise that I'm not just slacking. Promise.

Tuesday, April 18, 2006

Where Oh Where Has The Unemployed Cook Been?

Well, for a few days I was buried under some other projects, and then the holiday weekend came and everything I made (caramel popcorn, white bean dip with wonton chips, and picnic salad), were things I had made before, and then...

And THEN...

I got sick. Really, really up-all-night-with-gastro-intestinal-distress sick. And so, once I can look at anything more complicated than soda crackers (today, I'm trying rice!), I will be back, regaling you with stories and recipes alike, I promise.

Wednesday, April 12, 2006

Junk Food: Fried Calamari

If there is one thing that tempts every naughty-bad-for-you receptor in my brain on a regular basis, it is fried calamari. I have an almost unabashed love for the stuff, even if the offering is obviously pre-breaded and frozen and bearing enough of a resemblance in texture to pencil erasers to make you uncomfortable. I love it! And it's kind of embarrassing! Ah, well, we all have our junk food vices, be it Doritos or...I don't know...some sort of Hostess cake. This is my #1 vice.


One of my most favorite food memories involves calamari, which isn't too surprising, I suppose. When I lived in New York I worked at a pretty horrible, but highly profitable (for me) bar on the Upper East Side. The clientele and majority of my coworkers were pretty miserable, but I worked with my great friend and roommate, and she helped make it worthwhile. We quickly volunteered to work Sunday afternoons, a virtual wasteland with no customers for the first several hours of the shift. Were we upset to be languishing away our Sunday afternoon making no money? Certainly not! We would order mediocre calamari from the kitchen, slather it with lemon and extra salt, and watch The Shining on the big screen television week after week. I'm not exaggerating when I say it was a really special time to me.

And so, when I received Nigella Lawson's Nigella Bites as a gift from my lovely sister-in-law a couple of years back, I was of course immediately taken with her Salt and Pepper Squid recipe. The problem? Tracking down squid in my neck of the woods. Yes, there is a wonderful seafood store in town, but I never remembered to drop by until it was too late. And so, the months passed by with only the occasional restaurant splurge to feed my strange (and admittedly non-gourmet) obsession.

Until today. Today, whilst swinging through the North Knoxville Kroger's (where I never, ever shop), I spied a "New Item!" in the seafood department. That new item? A pound of lovely snow white squid, tentacles and tubes, ready for my greedy little hands to snatch them up.

And so, with no further hesitation, Nigella's recipe came to fruition. I, of course, made some changes to her instructions. She calls for a much coarser salt and pepper mixture, and while I am sure that makes this a teeny bit fancier, I knew what I was after and how to get it. I like lots and lots of lemon and a bit of extra salt sprinkled over the whole batch, and I highly recommend eating them hot, right off of the paper towel-lined plate.

Decidedly Not Fancy Fried Calamari
serves 2 (or even 1)

1 pound squid--cleaned, trimmed, and sliced into appropriate shapes
1/3 cup corn starch
sea salt
freshly ground pepper
roughly 2 cups vegetable oil
lemon wedges for serving


In a medium Dutch oven (or other heavy, deep pan), heat .5 inch of oil over medium-high heat. While the oil is heating, mix the cornstarch and a generous amount of salt and pepper in a large zip-top bag. Toss the squid rings and tentacles into the bag, seal, and give a very thorough shake. When the oil is just smoking, add about half of the calamari. You shouldn't need to turn them, the oil should bubble up over the delicious bites nicely. After about 2 minutes, they should be a light golden brown (take care to not overcook, the color should be light). Use a slotted spoon to remove to a paper towel-lined plate, and sprinkle with salt. Fry the second batch. Serve with lots of lemon over the side, and share with a friend, sitting side-by-side. Or, you know, just devour the whole plate yourself.

Monday, April 10, 2006

Grilled Chicken and Peppers with Skillet Corn

Longer days + warm weather = grilling in this household. And so, with Chris' help, I made this super simple meal that paid off with big flavors. Don't skip the basil, it really is the perfect touch.


Grilled Chicken and Peppers with Skillet Corn
serves 2

for the peppers:

1 red bell pepper
reserved chicken marinade (see below)
sea salt
freshly ground pepper
sweet basil leaves (for garnish)


Prepare a charcoal grill. When the coals are grey and nice and hot, grill the pepper until black and blistered on all sides. Place hot pepper in a Ziploc bag and let stand for 10 minutes. Remove from bag and rub or peel skin off. Slice into strips and toss with the reserved marinade, sprinkle with salt and pepper, and set aside.


for the chicken:

.75 lb. chicken breast tenders
2 Tbsp balsamic vinegar
3 Tbsp white wine
2 Tbsp chicken stock
juice of 1 small lemon
sea salt
freshly ground pepper


Mix all ingredients other than chicken. Reserve 2 Tbsp of marinade for the peppers, then add the chicken to it, turning each piece to coat. Marinate for 20 minutes. Grill over medium-high heat for about 3 minutes per side.

for the skillet corn:

3 ears corn
1 shallot, thinly sliced
1 Tbsp salted butter

Melt the butter in a skillet over medium heat. Add the shallot and cook until soft and starting to brown, about 3 minutes. Add corn and saute for another 3-4 minutes, until the corn is bright and still crisp. Add salt and pepper if desired, but we found the corn so sweet and perfect on it's own, I didn't add a thing.


To put it all together, I recommend placing the chicken on a bed of corn, topping with the red pepper slices, and garnishing with the reserved pepper marinade and a few basil leaves. We ate this warm, but I think it would make a great lunch cold or at room temperature.

Broiled Lemon Trout

And...the new design is live! Drop a comment and let me know what you think, even though I had absolutely nothing to do with how great it looks. The real credit goes to Suzanne, a brilliant photographer and crack web designer. Thanks, Suzanne!

On to the trout. This simple preparation is good for any light, delicate fish. I personally love the sweetness of trout and I prefer to highlight those flavors, rather than try to cover them up. Even better, it's done in less than 10 minutes, and is delicious to boot.


Broiled Lemon Trout
serves 2
2 rainbow trout fillets
2 Tbsp butter
4 thin slices of lemon
chopped fresh parsley
chopped fresh tarragon
sea salt
freshly ground pepper


Preheat your oven's broiler. Rinse fillets and dry well with paper towels. Sprinkle generously with salt and pepper, then toss the parsley and tarragon over each fillet. Dot with butter and lay the lemon slices over the top. Broil until golden brown in spots and the fish is opaque and flaky (about 5-7 minutes).


This fish is perfection served with Spring Succotash and Cherry Tomato Bruschetta, and it's also quite good cold, in chunks over a salad.

Friday, April 07, 2006

Sides: Spring Succotash and Cherry Tomato Bruschetta

Thanks to my exceedingly talented friend Suzanne, things are going to be looking much different (and better!) around here. She has taken some stunning photographs and is working up a more functional template, as well. Now on to the overdue entry:

I generally love to go to the grocery store. I love wandering through the aisles, picking out just what I need, and perusing any new and exciting products that catch my eye. But sometimes? Sometimes the grocery store makes me want to cry. When I can't find something I really, really need (read: want) at my regular market, I become a petulant, pouty child. When I can't find what I want at a second grocery store? Well, I become downright angry.


The source of my ire? Fava beans, and the lack thereof in North Knoxville. I am nearly sure that The Fresh Market, or maybe even Earth Fare, has the little devils, but I was in a hurry and there was no time to truck across town. And so, I had to settle for Lima beans. Lima beans! I was despondent.

Luckily, the other vegetables in this tribute to Spring flavors were crisp and perfect, and almost made up for the disappointing Limas. Next time, I'll just leave them out if I can't find favas. The "bruschetta" is just heartbreakingly simple and delicious, especially on a slice of fresh brioche. This vegetable-heavy plate makes it a perfect candidate for SweetNick's ARF/5-A-Day weekly event, so check it out on Tuesday for a swell round up of healthy recipes.


Spring Succotash
adapted from Martha Stewart's Healthy Quick Cook
serves 3-4

1 smallish red pepper, chopped
.5 cup fava beans (about 10 pods)
2 ears of corn, kernels cut off
1 shallot, chopped
.5 English cucumber, sliced into half-moons
olive oil
sea salt
freshly ground pepper
fresh tarragon, chopped

Heat some olive oil in a large non-stick skillet over medium-low heat. Add the shallot and cook until soft, but not browning, 3-4 minutes. Raise heat to medium, add the corn, pepper, fava beans, and cucumber, saute for 5 minutes. Season with salt and pepper, and stir in the tarragon. Cook 1-2 minutes more, until you reach desired doneness (some people like things a bit crunchier than others). Serve warm, cold, or at room temperature.


Cherry Tomato Bruschetta
serves 2
2 slices brioche
handful small cherry tomatoes, halved
olive oil
sea salt
freshly ground pepper
goat cheese crumbles*
fresh basil

*I used some grated Parmesan for Chris, who is not a goat cheese enthusiast.

Toss the halved tomatoes in a drizzle of olive oil, and a good sprinkling of salt and pepper. Set aside.


Toast the brioche until golden and crunchy. Immediately crumble the goat cheese over the warm bread, let sit for 30 seconds. Spread the now softened cheese just slightly to adhere to the toast, then top with tomato mixture. Sprinkle a chiffonade of fresh basil over the top, and serve. This is wonderful with a small salad as a light lunch, as well.


I served these lovely sides with some lemon roasted trout, recipe to come in the next entry. Spring is finally here, people, it's time to celebrate!

An Epiphany (Or, How I Made Brioche)

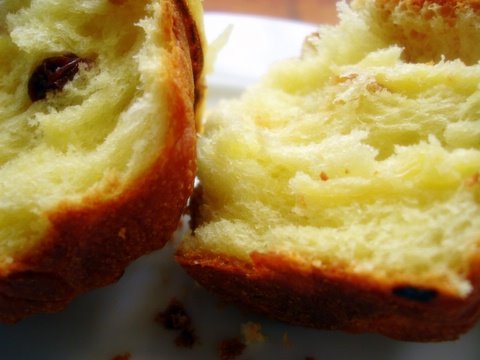
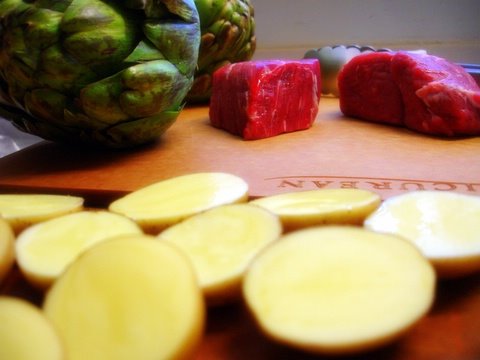
While I have been gaining confidence as a baker, I still hold a comfortable amount of trepidation when it comes to certain, okay most, flaky French breads. The idea of attempting a truly perfect croissant makes me break out in a sweat, and honestly I always put buttery brioche on the same pedestal.


Until now.

Ina Garten can be so convincing, she always seems to confident that I can make something. Even better, unlike a certain sexy Brit, her recipes are very clear and usually work out perfectly with little interpretation. Such is the case with her recipe for Brioche Loaves, which I tweaked and fiddled with to my liking. Once I worked out two uncharacteristic and potentially ruinous typos (to paraphrase a friend, "Put some shoes on and get to proofreading, Ina!"), I set out to make the bread of my dreams.


The epiphany came whilst rolling golden raisins into the dough, "If this works...I could have brioche all the time." And work it did, producing excellently light brioche that was tender and exquisite. I fear we have entered a dark time for my waistline.

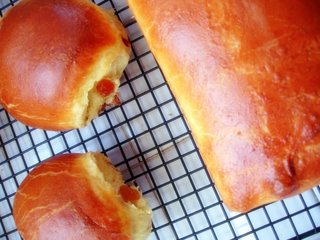
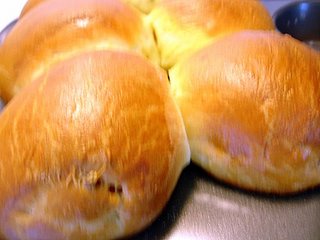
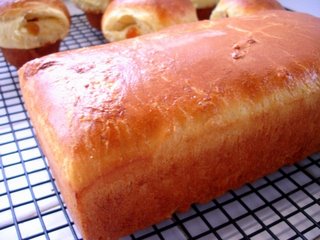
I made one brioche loaf and 6 "muffins" of my own design--who needs dear little brioche pans when you have a nice non-stick muffin tin? Next time, unless I need loaf for a particular dish (as I did last night), I will make a whole pan of my delicious muffins--studded with golden raisins and dried cherries, they are the perfect breakfast or mid-afternoon snack.


Brioche Muffins (or Loaves, or both)
makes 12 muffins, or 2 loaves
with thanks to Ina Garten

.5 cup warm water
1 package active dry yeast
3 Tbsp sugar
6 large eggs, at room temperature
4.25 cups unbleached flour (King Arthur is the best)
2 tsp salt
2 sticks butter, very soft (leave it out overnight)
1 egg, for egg wash
1 Tbsp milk, for egg wash
1 cup golden raisins and dried cherries (optional)

Warm the bowl of your mixer with hot water, then dump it out. Mix the yeast, warm water, and sugar in the warmed bowl with a rubber spatula. Let sit for 5 minutes, until it is foamy and the sugar has dissolved. Add the eggs and using the paddle attachment, beat on medium speed for 1 minute, until mixed.

With the mixer on low speed, add 2 cups of the flour, and the salt, and mix for 5 minutes. With the mixer still on low, add two more cups of flour and mix for 5 minutes more. Still on low, add the soft butter in chunks and mix for 2 minutes, occasionally scraping the paddle, for 2 minutes longer.

Switch to the dough hook attachment, and set on low speed again. While the mixer is running, sprinkle in the last quarter cup of flour. Mix on low speed for 3-4 minutes, until well combined and elastic, but still sticky. This is a soft, sticky dough. Scrape the dough into a large buttered bowl and cover tightly with plastic wrap. Refrigerate overnight.

The next day, allow the dough to sit at room temperature for an hour--it should have risen substantially in the fridge. Grease a 12-muffin tin, if you are making muffins, or two loaf pans. As you see, I did a little of both.


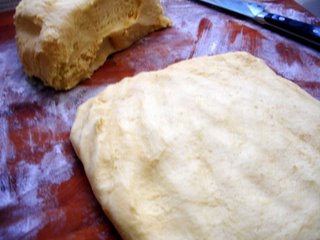
Turn the dough onto a floured surface and cut in half. For muffins: pat each half into a rectangle with the dough about a half inch thick. Spread the raisins and dried cherries evenly over the rectangle, using more if desired. Starting on one of the rectangle's wide ends, roll up into a tight cylinder. The dough may stick, use a pastry scraper or a sharp knife to help loosen it. Pinch the seam closed. Cut each cylinder into 6 equal portions. Stick each dough portion seam side down into the muffin tin. Cover and let rise in a warm spot for 2 hours, until doubled in size.

For loaves: pat each half into a 6x8 rectangle, and roll on the wider side, as instructed above (note: I did not use the fruit in my loaf, but you certainly could if you wanted). Place each cylinder, seam side down, in a loaf pan. Cover and let rise in a warm spot for 2 hours, until doubled in size.


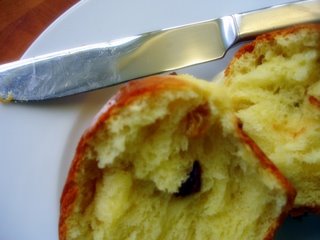
Preheat the oven to 375 degrees (as always, I recommend preheating for at least an hour to let the oven heat to a very even temperature). Beat the egg with the milk and brush the tops of the risen muffins (or loaves). Bake the muffins for 25-30 minutes, until they are a deep golden brown. Bake loaves for 30-35 minutes. Let cool briefly in their pans before transferring to a wire rack to cool completely. You absolutely MUST eat a muffin while still deliriously warm, if you don't I'm not sure that we can be friends any more.


Once everything has cooled completely it can be wrapped in parchment and stored in a plastic bag for up to three days, or frozen for a month. I'm sorry there aren't more pictures of the baking process, but once I touched the dough it was all over my hands and I just had to get it done. Make brioche this weekend!
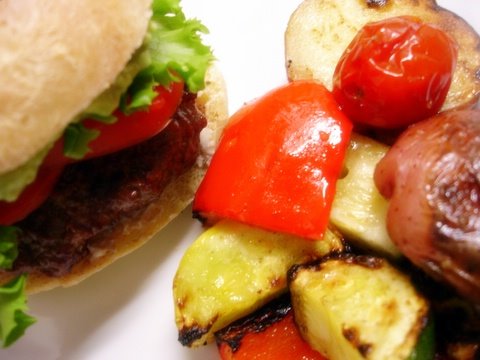
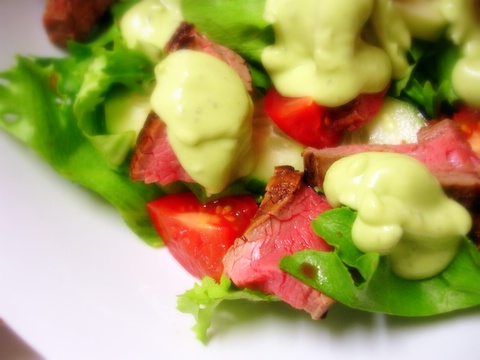
Steaks and Artichokes with Bearnaise Sauce

As you see, the promised return to the good life has delivered, with a thorough trip to not one but two grocery stores, I am fully prepared to cook up a storm, and not think, quite as much, about the budget.

That said, you will benefit greatly from buying the best steak you can afford. I ended up with two tiny, but exceptional, fillets; deciding that when faced with 4 oz. of tender perfection vs. 10 oz. of chewy toughness, the tiny specimen will always win out.


I owe my friend Lauren, once again, for the trick to incredibly easy, perfectly steamed artichokes, which were a grassy green foil to the bright flavors of the bearnaise sauce. In fact, I highly recommend dipping the artichokes, steak, and possibly your fingers into this sexy cousin to Hollendaise--until you feel yourself floating away on a cloud of butterfat. What a way to go.


Steaks and Artichokes with Bearnaise Sauce
for 2

for the Bearnaise*:

3-4 Tbsp Tarragon vinegar
3-4 Tbsp dry white wine
1 small shallot, minced
1 Tbsp chopped fresh tarragon leaves
sea salt
freshly ground pepper
2 large egg yolks
.75 stick butter, melted


Put the vinegar, wine, shallot, a pinch each of salt and pepper, and half of the tarragon into a small saucepan. Bring to a low boil and simmer until reduced by half. Set aside to cool slightly.

Place the egg yolks in a blender, add the lukewarm shallot mixture and pulse to blend. With the blender running, slowly pour the hot butter through the opening in the lid. Add the remaining tarragon and pulse one or two more times. Add more wine if the sauce is too thick, but it should be just right.


Set sauce aside while you cook the steaks and artichokes. When it comes time to serve, pour a Tbsp of very hot water into the sauce and blend for 15 seconds.

*Ina Garten gave me the wonderful idea of blizting this in the blender, as well as the hot water revival trick. Many thanks, Ms. Ina.

for the artichokes:

2 large artichokes
water
large ziploc bag


Yes, those are the ingredients, it's that easy. When you are dipping your chokes into a rich sauce there is little need for any other flavoring. Trim the stem end of each artichoke and remove any tough, beat up leaves from the bottom. Wash under cool water, letting the water really penetrate the tight green heads. With some water on them, place the artichokes in the ziploc bag and zip closed. With some sharp scissors, snip 3-4 holes in the bag, then microwave for 11 minutes. Let stand to cool, and be careful of the steam when removing from the bag.


for the steaks:

2 beef filets, at least 1 inch thick
sea salt
freshly ground pepper
olive oil


Sprinkle steaks liberally with salt and pepper. Heat olive oil over high heat until it just starts to smoke. Add steaks and sear for 1 minute per side. Reduce heat to medium-low and cook for another 8 minutes, for a gorgeously rare center. Remove to a platter and cover tightly with aluminum foil. Let sit at least 5 minutes, but 10 is better.


Serve steaks with bearnaise sauce drizzled over, and the remaining sauce in ramekins for dipping. Dip the verdant artichoke leaves in one by one, scoop out the prickly choke and dip the heart in as well. If you have someone in the house that is worried about an artichoke and a tiny steak being enough food, some crisp roasted potatoes do quite nicely. Now, go float away on that butterfat, sweet friends, and treat yourself to something decadent.