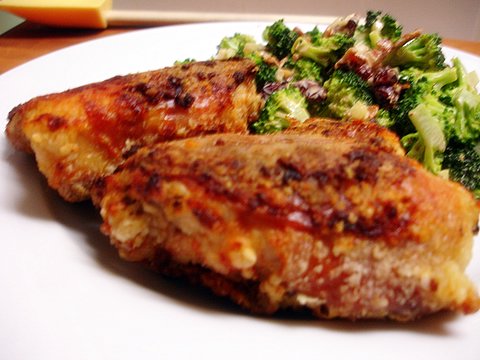
Tuesday, February 28, 2006

Steak au Poivre

I have admitted in the past to be a raging Francophile, so it shouldn't surprise you that this is one of my favorite ways to eat steak. The super easy pan sauce really makes the dish, and if you use a good cut of meat you will be left with a show stopper. Serve this with some roasted potatoes and a great salad, and you'll leave them begging for more. Oo-la-la!


Steak au Poivre
serves 2

2 6-oz. beef tenderloins*, at least 1 inch thick
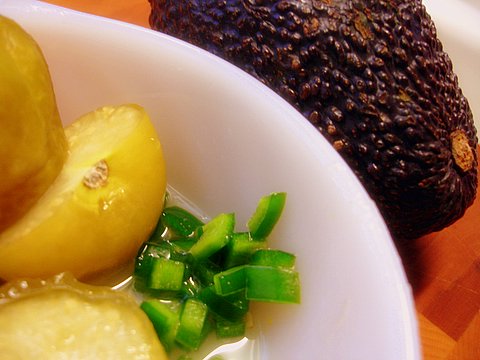
cracked peppercorns
coarse sea salt
2 Tbsp butter, divided
.5 Tbsp olive oil
1 shallot, chopped
.25 cup beef stock
3 Tbsp cognac or brandy

*Other good cuts are New York Strips, Ribeyes, and Hanger steaks.

Place filet on a board and pat dry with a paper towel. Sprinkle both sides with coarse salt and cracked pepper, pressing the grains in evenly. Let sit at room temperature for 15 minutes.


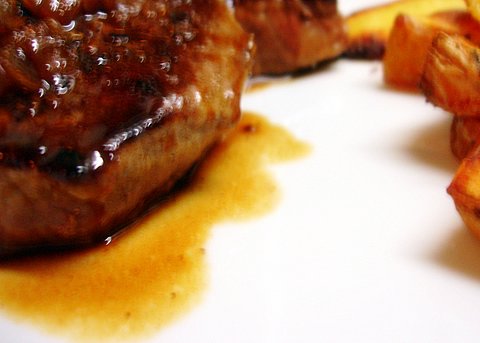
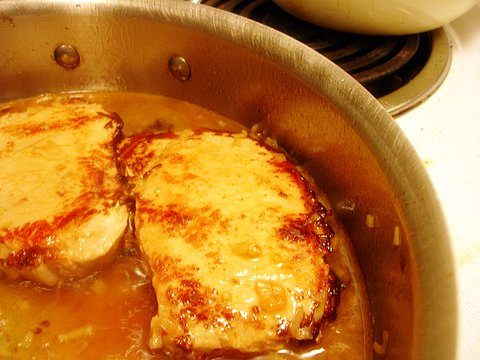
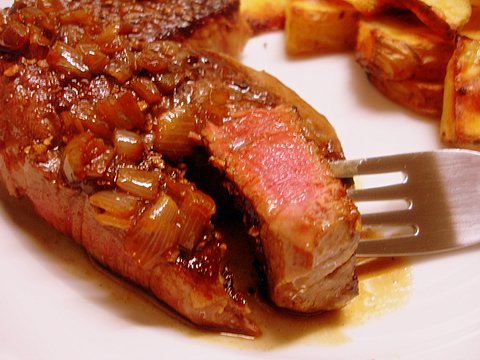
Heat 1 Tbsp of the butter and all of the olive oil in a large, heavy saute pan over medium high heat until the butter is almost smoking. Place the steaks in the pan and lower heat to medium (turn your range fan on, it will get smoky!).Saute the steaks for 3 minutes on one side, 2 minutes on the other for medium rare meat (longer if the steaks are thicker than 1 inch). Remove the steaks to a platter and cover well with foil--they continue to cook while resting, so be careful to not over cook.

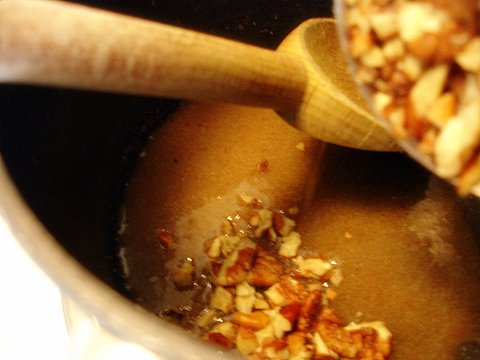
Pour off fat if there appears to be more than a Tbsp or two remaining in the pan. To the one Tbsp of hot pan fat, add the shallots and cook over medium heat for 2 minutes. Add the beef broth and cook over high heat for 4-5 minutes, until reduced by half, scraping up the browned bits from the bottom of the pan.


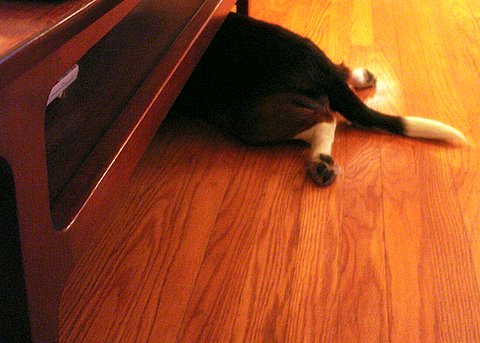
Add the cognac or brandy and cook over high for 1-2 more minutes. Off the heat, swirl in the remaining Tbsp of butter and a pinch of salt. Serve the steaks hot with the pan sauce spooned over the top. We ended up eating this fine meal on the couch so that I could get my "American Idol" fix, and Buster watched us from the position all night. How can you not want to make something that so enraptured this little dog? Worth every penny!

Sliced Pear and Caramelized Pecan Salad

Crunchy, spicy-sweet pecans; crisp, cool pears; smooth, nutty Gruyere--are you drooling yet? This is a simple little salad (once you make the nuts, which are a snap), and it tastes and looks like something you would pay $10 for in a restaurant. Wonderful with a really good steak--enjoy!


Sliced Pear and Caramelized Pecan Salad
serves 4

for the pecans:

.5 cup pecan pieces
2 Tbsp sugar
pinch cinnamon
pinch ground cloves
pinch cayenne pepper
generous pinch sea salt
splash water

Preheat oven to 325 degrees and line a small cookie sheet with aluminum foil.


Mix everything but the pecans in a small saucepan set over medium heat. Stir until combined and becoming liquidy. Add pecans, stir for 1-2 minutes until well coated. Spread out on cookie sheet and bake for 8-10 minutes (tossing once or twice), until golden. Let cool completely before using (that way they will have a crunchy coating).


for the salad:
one pear (nearly any variety, I used bosc)
one small head radicchio
one small head bibb lettuce
caramelized pecans
Perfect Vinaigrette
hunk of Gruyere


Wash and dry lettuces, tear into medium-sized pieces. Slice your pear into thin slivers, arrange with the lettuces. Drizzle with vinaigrette, sprinkle with pecans, and top with a pretty shaving or two of Gruyere. Of course, if you prefer you can grate the Gruyere, but I'm a sucker for presentation and this just looks so lovely. Doesn't it?

Monday, February 27, 2006

Open-Faced Tuna Burgers with Wasabi Mayonnaise


Upon finding some especially gorgeous-looking tuna at my fish counter, I was struck with the idea to recreate a dish I really liked at a restaurant I worked for a few years back. I could only remember the basic idea of the dish, so it was fun to try and put it together on my own. I think you will enjoy the melange of flavors, the healthy leaning, and the altogether lovely dish this makes. Enjoy!

Open-Faced Seared Tuna Burgers with Wasabi Mayonnaise
makes 4 small open-faced burgers (2-3 servings)


for the Wasabi Mayonnaise:

1 Tbsp mayonnaise
1 Tbsp sour cream
wasabi paste (use as much as you prefer)
fresh coriander (cilantro), chopped

Mix all ingredients well, set aside to let flavors mix. Adjust seasoning, then use to top burgers--it's also pretty tasty as a dip for the sweet potato crisps!


for the burgers:

2 sushi-quality tuna fillets (about 1 lb.)
3 Tbps Tamari/soy sauce
2 Tbsp toasted sesame oil
1 Tbsp rice wine vinegar
.25 cup chopped coriander (cilantro)
sea salt
freshly ground pepper
4 small French bread rolls, sliced and lightly toasted
prepared seaweed salad (optional)


Chop your tuna fillets semi-coarsely (a good knife is going to do you well here, I recommend the Wustof Santuko). In a bowl, mix with 3 Tbsp of the soy sauce, 1 Tbsp sesame oil, the rice vinegar, coriander, and salt and pepper to taste. Mix well, but gently, and refrigerate for 30 minutes. If your tuna is good quality, take a taste of it raw--wouldn't this make great tartare?


Form the tuna mixture into 4 patties--they will be very loose, you might want to stick them into the freezer for 20 minutes or so after forming. Heat a splash of olive oil with the remaining sesame oil in a non-stick skillet over medium-high heat until just smoking.

Carefully sear the patties for 2 minutes per side (if you are gentle they will stay together), remove from heat. I really think these are best rare, so be careful to not over cook. Well, unless you like it that way.


Top each roll half with some seaweed salad, then top with burgers and wasabi mayonnaise; serve. We ate these up with steamed edamame and a pile of yellow sweet potato crisps alongside. Pretty freaking great, if I don't say so myself.

Radish Watch: 2006

Since I'm obsessed with my wee radishes, I figured I would bombard you with updates you aren't even requesting. But look, sprouts!

Day 2:


Day 4:


Stay tuned for more scintillating radish jibber-jabber. Or, you know, for the other, more interesting and delicious entries.

Yellow Sweet Potato Crisps

Sweet potato chips are a wonderful take on the original, I think, especially when they are lightly sprinkled with coarse sea salt. In the past when I have tried to make these myself, I have run into two dilemmas:

1. Sweet potatoes are, well, SWEET, and all of that sugar loves to burn.

2. If you don't get the chips thin enough they will completely char before getting fully crisped throughout.


So, I set out to do some homework. I was looking for technique advice, even though I think my potato chip technique is pretty good, but ended up finding the solution to my problems, the humble yellow sweet potato. Yellow sweet potatoes have much less sugar are are firmer and starchier than their orange-fleshed brothers. They have a flavor and texture closer to a standard white potato, which bodes well for my success.

I set out to make these crispy delights as such. Take one large, long yellow sweet potato and peel with a vegetable peeler. Using the same peeler, start peeling uniform slices from the potato. The peeler should help to keep the thickness the same, and as long as you don't care about having round chips (so last year), it's very simple. Obviously, use a mandoline if you have one, but I don't and I'm rather proud of my method.


One potato makes a big pile of chips, and they don't keep super well, so only make as many as you need. Dunk the raw slices in a bowl of ice water, strain, and then dunk again. This helps rinse off some of the starch that prohibits crunchiness. Pat the raw chips dry with some paper towels.


Heat an inch or two of oil (I use a combination of canola and olive) over medium to medium high heat. You want it hot, but not smoking. Test the oil by dropping in a couple of chips. They should be golden and crispy within 2 minutes. Working in batches, fry the chips, using tongs or a slotted spoon to toss them in the oil occasionally. Drain on several layers of paper towels, and sprinkle with salt.


These are excellent while they are still warm, extremely crispy and delicate, but unless they are your main course it's pretty tough to make them and an entree. I recommend spreading them out on a cookie sheet and warming them for 3 minutes in a 350 degree oven. Delicious with burgers, tonight we are having them with seared tuna mini-burgers. Yum!

Sunday, February 26, 2006

Pork Chops in Mustard Sauce with Polenta "Fries"


We love pork around here, as you can see I cook with it at least once a week. The original pork chop recipe was passed to me by my friend Emily, and it looked pretty good to me so I only made a few changes.

The polenta fries were a complete whim, but they worked well and the flavors were quite nice with the mustard sauce. I am sure you could make your own polenta instead of using the 5 minute boxed kind, but there's only so much I can do, folks. Well, really, I just already had the boxed stuff, so convenience prevailed.


Pork Chops in Mustard Sauce with Polenta "Fries"
serves 2

The heat of the dish should just wilt your spinach, adding a nice textural element.

for the polenta fries:
1 box instant sundried tomato polenta
olive oil


Prepare polenta as directed, then pour into an 8 x 8 baking pan and pat into a uniform, flat square. Let sit, either on the counter or in the refrigerator, for at least an hour so it firms up really well. Slice into 1 inch thick, 3 inch long "fries".


Heat enough olive oil to coat the bottom of a fry pan over medium-high heat. Use a flexible spatula to remove a few of the fries from the pan at a time, and fry on all sides, working in batches. I recommend using a splatter guard--the oil splashes a LOT and makes quite a mess of your stovetop. Drain briefly on a paper towel lined plate before serving.

for the pork chops in mustard sauce:

2 pork center loin chops, about 1 inch thick
sea salt
freshly ground pepper
olive oil
.25 cup dry white wine
1 clove garlic, minced
1 small shallot, minced
.25 cup stock
spoonfull chicken demi-glace (optional)
1 Tbsp butter
1 Tbsp fresh lemon juice
1 Tbsp dijon mustard
dash Worcetershire sauce
baby spinach

Sprinkle chops with salt and pepper. Heat a heavy skillet over medium-high heat for 2-3 minutes. Add some olive oil and heat until it just begins to smoke. Add chops, turn heat to high. Brown on both sides for 1-2 minutes per side.


Reduce heat to medium and add wine, garlic, and shallots. Cook, turning chops occasionally, until the wine is all but evaporated. Add stock, turn heat to low, and cover. Cook for 10-15 minutes, turning chops once or twice.

Place a handful of baby spinach on each dinner plate. Place pork on top of spinach. Turn heat to medium high and add butter, lemon, mustard, and Worcestershire sauce. Scraping up the browned bits in the pan, reduce sauce slightly.


Arrange polenta fries on top of pork chops and spoon the sauce over everything. Serve immediately.

Saturday, February 25, 2006

A kitchen garden.


Joyeux anniversaire à moi! It has been one month since I started this blog, and I'm celebrating by starting a kitchen garden. I am very lucky to have a door off my kitchen that leads to a part of the yard with an arbor, patio, and elevated flower bed. It's the perfect spot for grilling and for the year we've lived here I've had big ideas about turning the bed into a primarily herb garden.


And now, it's becoming a reality! It is still early in the season so I can only plant a few things--yesterday I put lettuces, rosemary, lavender, and strawberries in the ground. I am also trying to sprout some radishes, since I have trouble finding the young, tender radishes I became addicted to in France in this part of the country.


Even though there's no recipe here, I've submitted this to Weekend Herb Blogging over at Kalyn's Kitchen. Check out her recap, there are always tons of great recipes!

Friday, February 24, 2006

Oven Fried Buttermilk Chicken

Mmmm...fried chicken. I have an almost shameless love for the stuff, even the less desirable of offerings (chicken fingers, anyone?). But generally, if I'm craving fried chicken, I'm craving THIS fried chicken.


Soaking the meat in the buttermilk and onion mixture is key--it boosts flavor in the meat and helps the flour adhere to the skin up so that it crisps up nicely. Follow these simple directions and you will end up with a platter of gorgeous fried chicken every time.

Oven Fried Buttermilk Chicken
serves 2-3

8 chicken thighs, with bones and skin on (I've also made this with legs to good effect)
1 quart buttermilk
1 small onion, coarsely sliced
2 Tbsp sea salt
2/3 cup all-purpose flour
1 tsp freshly ground pepper
1 or 2 fat pinches cayenne pepper
2 Tbsp butter
splash grapeseed or olive oil
salt and pepper for serving

Rinse and pat dry chicken, place in a large bowl. Toss onions on top, and pour in buttermilk. Add cold water until chicken is covered. Dissolve 1 Tbsp of the salt in a little warm water, pour over chicken mixture. Give a stir to combine and refrigerate overnight (or at least 6-8 hours, so put it in before you go to work, or in the morning if you don't work).


Preheat oven to 400 degrees. Add butter and splash of oil to a baking dish large enough to fit the chicken in one layer, and place baking dish in oven while it preheats, until butter is melted completely. You want your pan to be really good and hot, don't skimp on the preheating time.


Pour 1 Tbsp of salt, the two kinds of pepper, and the flour in a large ziploc bag, seal and shake to combine. Remove chicken from buttermilk mixture and pat completely dry. Place two pieces of chicken at a time in the ziploc bag, seal shut, and shake to thoroughly coat. Shake off the pieces of chicken to remove excess flour--this is important or you could end up with a mushy coating. Line up on a cutting board or a plate after coating.


Place chicken in hot pan, skin side down, and bake until the skin is a deep golden brown (this takes at least an hour to an hour and fifteen minutes, on average). Flip chicken and cook until the same color is achieved on the other side (about 20-30 minutes). Remove to serving platter, sprinkle with sea salt and freshly ground pepper before serving.


This is good hot out of the oven, at room temperature on a picnic, or cold from the refrigerator. And the meat is great on biscuits for breakfast. Yum.

Picnic Salad

I am sure that by this weekend it will snow and kill all of the daffodils, but right this very second it really does feel like spring is making an appearance. And so, I'm continuing what has become a theme for the week: Culinary Spring Break.


I think I first had a version of this salad eating dinner with the family of a college boyfriends, I scooped up big forkfuls and loved the combination. I assumed that this was a brilliant creation of my boyfriend's mother, until a few months later when I was served something very similar at a cookout thrown by friends. It was that moment when I realized that while this was a unique combination, it wasn't rocket science, and so I created my own broccoli salad, dubbing it "Picnic" salad because it is a great salad for cookouts and picnics, although it should stay cold because of the mayonnaise in it. It's really, really good with fried chicken.

Picnic Salad
serves 4

3 cups broccoli but into small florets
.5 cup dried cranberries (raisins, currants, and cherries work, too)
.5 cup roasted, salted sunflower seeds
5 slices bacon cooked, then crumbled
3 Tbsp finely chopped onion
.5 cup mayonnaise
2 Tbsp cider vinegar
1 tsp sugar
pinch freshly ground pepper


Steam the broccoli florets until they are bright green and just beginning to soften, but still very crisp. Run under cold water and let cool and dry completely in a colander.


In a serving bowl combine the steamed broccoli, cranberries, sunflower seeds, bacon, and onion. In a small bowl, whisk together the mayonnaise, vinegar, sugar, and pepper. Pour over the broccoli mixture and gently combine. Serve immediately or refrigerate for later use. If I am not serving this right away, I sometimes like to wait and add the bacon later, so it stays crisp. Enjoy!

Grilled Shrimp Tacos with Tomatillo Avocado Sauce

Continuing my "culinary Spring fever" theme, I made one of my favorite recipes tonight. While the ingredients are available nearly year-round these days, this is still something that evokes warmer weather with every bite.


Grilled* Shrimp Tacos
serves 2-3

*we were low on charcoal and ended up cooking these under the broiler. Still very good, I promise.

1 lb. large shrimp, peeled and deveined (about 30 pieces)
2 Tbsp butter
2 cloves garlic, coarsely chopped
juice of 2-3 wedges of lemon
sea salt
freshly ground pepper
white corn tortilla shells (or soft flour shells, depending on preference)


Use 2-3 metal skewers to skewer shrimp. Melt butter, 15 seconds at a time, in microwave with garlic and lemon juice. Stir well to combine and add salt and pepper to taste. Using a basting brush, brush melted butter concotion over the shrimp generously, on both sides. Preheat broiler (or grill) and broil for 2-3 minutes per side--but watch the shrimp, once they are bright pink and a bit brown on the edges they are done!

Heat tortilla shells and fill with 4-5 shrimp. Top generously with the tomatillo avocado sauce, the serve. We had this with a simple tomato and caramelized onion salad, it was lovely.


Tomatillo Avocado Sauce
makes...plenty

3 medium tomatillos
1 Tbsp chopped fresh cilantro
half of a small onion (about .25 cup), coarsely chopped
.5 tsp chopped seeded jalapeno pepper (or more if you like the heat)
.5 tsp salt
heaping .25 cup sour cream (I used Horizons natural low-fat)
1 ripe avocado, peeled and chunked
juice of 1 lemon
1 clove garlic, coarsely chopped
olive oil


Discard husks and stems from tomatillos. Place in a small saucepan and cover with water. Bring to a boil and cook 3-4 minutes, until tender. Set aside and let cool to room temperature.

Place tomatillos, onion, jalapeno, cilantro, salt, and lemon juice in a blender or food processor and process until smooth. Add sour cream, avocado, and a good drizzle of olive oil, process until combined and very smooth. Serve as a dip, with chips, or on tacos. Enjoy!

Wednesday, February 22, 2006

Tenderloin "in Crosta"


The inspiration for this dish came to me by way of David Lebovitz, who writes about a dish made for him in Italy called Filetto in Crosta(scroll down). I will tell you up front that you have to start this process a day or two ahead of time, BUT, once you have made the herb rub it is pretty much idiot proof.

Tenderloin "in Crosta"
serves 3-4

for the herb garlic rub:


small handfull fresh rosemary leaves
slightly larger hadfull fresh sage leaves
zest of one lemon (this is my addition, I recommend it)
4-5 cloves garlic
small handfull sea salt

Chop all ingredients together until very, very fine--I actually grated the zest and garlic on a microplane and combined it with everything else. Spread out on a large dinner plate and leave out until dry--1 or 2 days. Once dry, you can store this for a week or two in a tightly sealed jar. Lebovitz recommends this for any number of purposes, including mixing it with olive oil and using it as a dipping sauce for bread. Oh, yum.


for the tenderloin:

one smallish pork tenderloin
1 french batard (like a fatter baguette)
herb garlic rub
olive oil

Preheat oven to 375 degrees.


Heat some olive oil in a skillet over high heat and sear the pork quickly on all sides. Transfer to a plate. Slice the batard lengthwise and drizzle each half generously with some olive oil. Sprinkle with the herb garlic rub--be careful to not use too much or the bread will be too salty. Sandwich the browned tenderloin between the two slices and wrap tightly with aluminum foil. Cook directly on the oven rack for about an hour and fifteen minutes (the meat should reach 160 degrees and still be pink in the center. Yes, it is done enough). Remove from oven and let sit, wrapped in foil, for 5 minutes. Slice and serve.


We had this with some seared asparagus and the mushroom soup I wrote about below. I highly recommend eating it like this: a small bit of the crunchy, herb-infused bread, stabbed with a bit of pork, and dunked in the mushroom soup. Please, try this, I beg you. The meat turns out so tender and flavorful, and the bread maintains its crunch, with so little effort on your part. Enjoy!

Edited to add: I've submitted this to Weekend Herb Blogging over at Kalyn's Kitchen. You should check out her site for tons of great herb recipe ideas!